本次魔改是基于Butterfly主题群群友小伙伴Aki指导完成,相关教程Aki也写了博文教程,具体可以移步过去看看,请点击这里,博主自己写下来是为了记录自己的魔改过程,以便日后查看。
效果展示
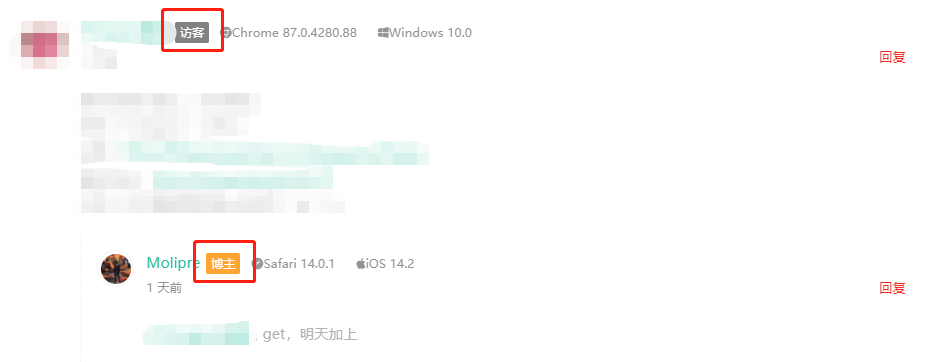
为valine添加‘博主、访客、友人’标签
- 用编辑器打开
/themes/Butterfly/layout/includes/third-party/comments/valine.pug文件,找到如图所示内容:script.
function loadValine () {
function initValine () {
let initData = {
el: '#vcomment',
appId: '#{theme.valine.appId}',
appKey: '#{theme.valine.appKey}',
placeholder: '#{theme.valine.placeholder}',
avatar: '#{theme.valine.avatar}',
meta: '#{theme.valine.guest_info }'.split(','),
pageSize: '#{theme.valine.pageSize}',
lang: '#{theme.valine.lang}',
recordIP: #{theme.valine.recordIP},
serverURLs: '#{theme.valine.serverURLs}',
emojiCDN: '#{theme.valine.emojiCDN}',
emojiMaps: !{emojiMaps},
enableQQ: #{theme.valine.enableQQ},
path: window.location.pathname,
} - 在
path: window.location.pathname,的下一行添加如下内容:添加时请注意格式对齐,master: '#{theme.valine.master}'.split(','),
friends: '#{theme.valine.friends}'.split(','),
tagMeta: '#{theme.valine.tagMeta || "博主,友人,访客"}'.split(',')博主,友人,访客可自由更改。 - 打开Butterfly的配置文件
_config.butterfly.yml,找到valine配置,如下:valine:
appId: # leancloud application app id
appKey: # leancloud application app key
pageSize: # comment list page size
avatar: # gravatar style https://valine.js.org/#/avatar
lang: # i18n: zh-CN/zh-TW/en/ja
placeholder: # valine comment input placeholder (like: Please leave your footprints)
guest_info: # valine comment header info (nick/mail/link)
recordIP: # Record reviewer IP
serverURLs: # This configuration is suitable for domestic custom domain name users, overseas version will be automatically detected (no need to manually fill in)
bg: # valine background
emojiCDN: # emoji CDN
emojiMaps:
enableQQ: # enable the Nickname box to automatically get QQ Nickname and QQ Avatar
requiredFields: # required fields (nick/mail) - 在
requiredFields: # required fields (nick/mail)的下一行添加如下内容:master: # md5加密后的博主邮箱
- ******************************** # md5加密的邮箱地址
friends: # md5加密后的小伙伴邮箱
- ******************************** # md5加密的邮箱地址
tagMeta: '博主,友人,访客' # 标签要显示的文字,默认'博主,小伙伴,访客'- 添加时请注意格式对齐,
博主,友人,访客可自由更改,但请与第二步相同。 - MD5加密请自行查找,或使用MD5加密,加密时请选择
32位小写,否者将无法被识别。
- 添加时请注意格式对齐,
- 打开Butterfly的配置文件
_config.butterfly.yml,找到CDN配置项中的valine项并替换成HCLonely魔改的版本,如下:# CDN
# Don't modify the following settings unless you know how they work
# 非必要請不要修改
CDN:
# main
main_css: /css/index.css
jquery: https://cdn.jsdelivr.net/npm/jquery@latest/dist/jquery.min.js
main: /js/main.js
utils: /js/utils.js
# pjax
pjax: https://cdn.jsdelivr.net/npm/pjax/pjax.min.js
# comments
gitalk: https://cdn.jsdelivr.net/npm/gitalk@latest/dist/gitalk.min.js
gitalk_css: https://cdn.jsdelivr.net/npm/gitalk/dist/gitalk.min.css
valine: https://cdn.jsdelivr.net/npm/valine/dist/Valine.min.js
#更换上面的valine为
#valine: https://cdn.jsdelivr.net/gh/HCLonely/Valine@latest/dist/Valine.min.js最后
- 操作到这一步就代表成功完成了本次修改,如需要更多的Butterfly主题魔改,请查看本博客其他博文,谢谢。
- 最后祝大家魔改成功,再见👋。


